Living in a small house I often find myself very short on wall space. I often have to take photos down and replace them with new ones before I am feeling ready to do so.
Because of that, I’m always trying to find unique ways to display my pictures.
Having already filled my fridge and having a large canvas wall print, I wanted to find some other way to display multiple pictures in a nice way.
That’s when I came up with the coolest way display of all in my opinion… a photo lamp.
This DIY Lamp is a Pinterest project you will love.


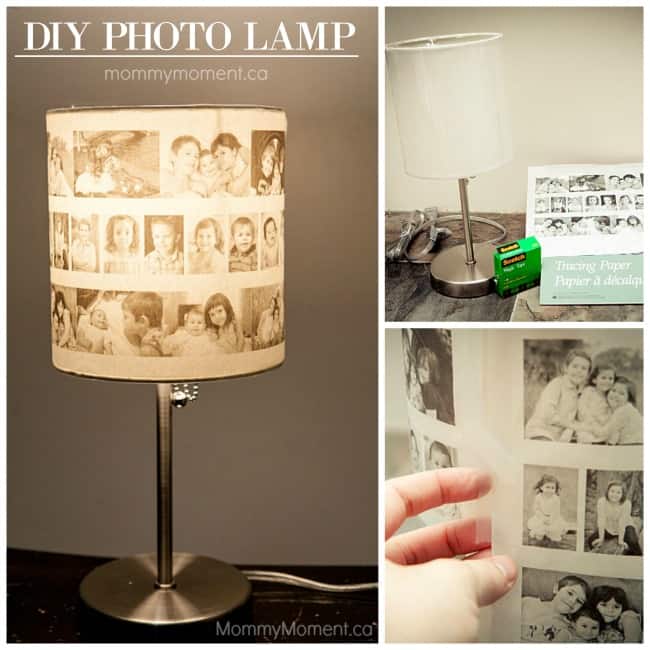
DIY PHOTO LAMP
This page may contain affiliate links for your shopping convenience. The links help support the blog as we may earn a small commission at no extra cost to you, our readers. As an Amazon Associate, I earn from qualifying purchases.
SUPPLIES
- Tracing or vellum paper
- A printer
- A lamp and lampshade (available here)
- Scotch tape
- Scissors or a paper trimmer
- Photo editing or scrapbooking software, even Microsoft Word would work if you don’t have any other program


In your editing program create a collage according to the dimensions of your lampshade and paper available.
Collage Preparation Tips
- I highly recommend changing your photos to black and white to give a more elegant looking lamp, if your program doesn’t give you that option try changing your printer settings to print in black and white only. Hint: If you’re going to make more than one, either as a gift or to sell, you’ll want to get a laser printer!
- Also, make sure to leave at least ½ and inch at the end so you can overlap the paper, some lampshades may need 2-3 different papers to cover the length so, in that case, make sure to leave the space on both sides.


After measuring your lamp, paper and designing your collage, cut the vellum or tracing paper accordingly to fit into your printer.
Print your collage onto the vellum or tracing paper, double check your placement and measurements and trim again if needed.


Wrap your paper on the outside of the lampshade and tape into place.
Turn your lamp on and voila, a photo lamp!


Check out our boards on Pinterest for more great ideas!

You may also like these posts on Mommy Moment.


You can sign-up to get an email update each day. You can also connect with us on:
Nadine is a stay at home mom/professional photographer from Winnipeg who specializes in children and newborn photography. You can see some of her work at www.allurebebe.com. She has 3 wonderful children Caleb 9, Amélie 7 and Leia 2 and has been married to her best friend for the past 10 years. Nadine loves photography, baking, reading, crafting, helping people and finding daily ways to teach all these loves to her children and others around her.
Linked up at Someday Crafts, I Gotta Create, Craftberry Bush, tatertots and jello, Sew Creative, Tidy Mom
Kiri
Thursday 4th of January 2018
Jody this lampshade is so cute! All kinds of feels right here. I can't wait to make one for my mom this year.
Jody @ Mommy Moment
Thursday 4th of January 2018
Thanks! Please do let me know when you have made yours, we would love to see a photo!
Barbara Harter
Monday 2nd of January 2017
How many pictures did you use?? I know it depends on the sizes, but the ones you used looks great.
paula schuck
Tuesday 8th of March 2016
This is super cute. I would totally try this at home. Thanks for the idea.
Deborah
Friday 1st of January 2016
What scrapbooking program would you suggest. My computer doesn't even have Microsoft word, unless you mean word pad and I cannot get that to save photos. It is for text only.
Kelly
Saturday 7th of March 2015
Can I just use actual photos? Why do I have to print pictures onto the vellum paper? Thanks!
Beth
Monday 4th of January 2016
You need to use vellum or tracing paper because light will shine through it. If you use a photo you will not illuminate it because the photo paper is too thick.
Rai
Saturday 2nd of May 2015
I would assume the biggest problem with using photos would eventually fade if you used real pictures instead of copies or it wouldn't illuminate as well.